

It’s a chocoholic’s dream. Decadent dark chocolate, rows on rows of bonbons and pastries all made with the best quality chocolate that has made its way over from Switzerland to Burnaby, B.C. thanks to Chez Christophe.
Chez Christophe is the owner and operator of Chez Christophe Chocolaterie Patisserie where chocolate is flowing six days a week in his Burnaby Heights shop. This Easter season, if you plan on making some chocolate eggs at home, listen up as Chez Christophe offers some tips on how you can create your own masterpieces at home.
The Project –
A bonbon filled Golden Egg nestled by a Dark Chocolate Lattice Egg

The Base –
- First up, you’ll need to create the base that will hold your egg upright. Using a textured mat which you can find in cookware stores or online, line up rings that will be used to form your base.
- Fill up a piping bag with tempered chocolate, and slowly squeeze into the ring.
- Slam down on the table to ensure its levelled and to force out air bubbles.
- Place in the refrigerator for 20 minutes for it to set.
- Once it is set, pop each base out of the ring and simply cut around the edges with a knife to clean up the shape.
- Tip: Don’t pour too much chocolate into the ring as it will be thick. Whenever possible, make your chocolate as thin as possible as it allows more flavour to come through making it more enjoyable on the palette.


The Lattice Egg –
- Next, you’ll be creating the lattice egg. For this, you’ll need to use a chocolate with a high coco content (65-70%) otherwise, it will not hold a shape but melt together into a goopy mess.
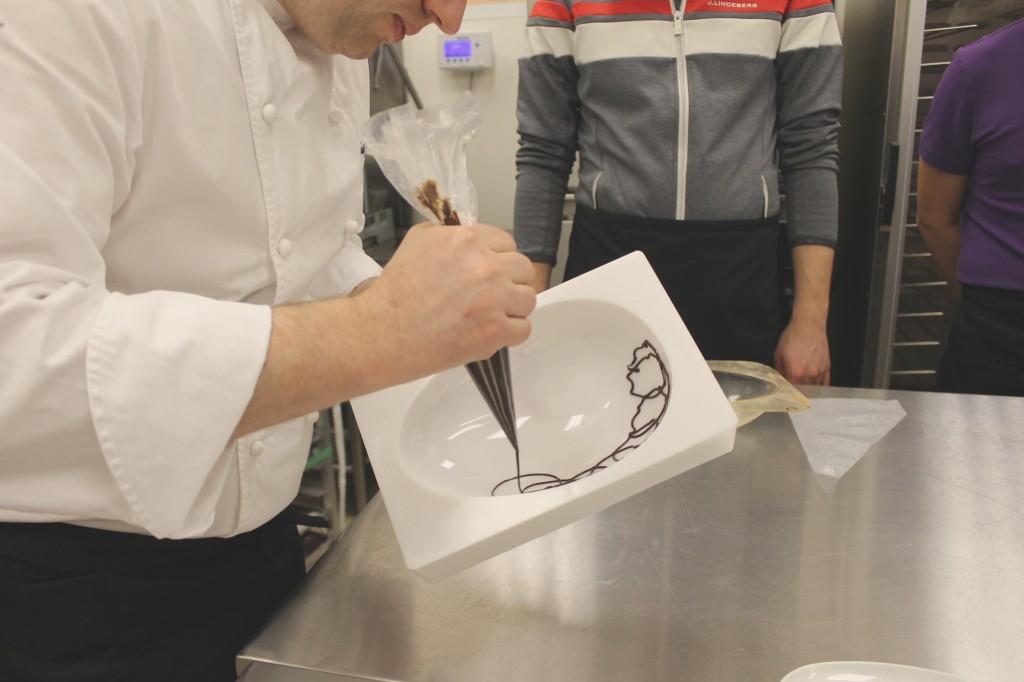
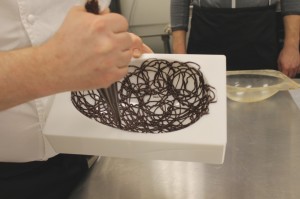
- Fill up a piping babe with dark chocolate. Hold your mold in one hand (again, available online or in a cookware store) and starting on the edge of the egg shape, begin to make small circular shapes around the outer ring.
- Continue making circular shapes to cover the entire surface
- Once you’ve done this once, repeat for the other half of the egg.
- Next, you’ll have to create the ‘feet’ of the egg. This is essentially a rim of chocolate along the entire edge so that a ‘ledge’ is created – allowing the halves to be fused together.
- Place both halves into the refrigerator and allow it to set for 20 minutes.
- Tip: You’ll need to pipe enough chocolate to ensure the lattice egg shells are strong, but without overdoing it so the intricacy of the design comes through as that is the wow factor!


The Golden Egg and Assembly –
- The egg receives its colour by dusting the mold with a gold powder prior to filling it with chocolate.
- Once filled with chocolate, set in the refrigerator for 20 minutes.
- Meanwhile, heat up a cookie sheet in the oven for a few minutes so it is warm. Flip it over and use the back side as a heat surface.
- Take one half of the egg, and gently place it on the cookie sheet moving it around for a few seconds until the edges are melted.
- Then, fill it with bonbons or even, a hand-written note written on a slip of paper.
- Take the other half of the egg and melt it on the cookie sheet.
- With the filled egg in your left hand, and the empty shell in your right hand, fuse them together for a few seconds ensures all of the edges are adhered.
- Place it down and let it set.
- Pick up half of your lattice egg, and melt the edges on the cookie sheet.
- Pipe in a little pool of chocolate at the bottom and gently place in your golden egg.
- Melt the edges of your second egg shell on the cookie sheet and merge the two halves together.
- Let it set.
- Pipe a sizeable pool of chocolate on your base, and place your egg onto it firmly.
- Tip: If you want to avoid having the treats within your egg shake around, adhere them to the interior of the egg with a few drops of chocolate – essentially using it to glue to keep them secured.


The Finishing Touches –
- For the at-home professional chocolatier, consider creating other decoration elements.
- Chez Christophe using an edible ink to print out his logo on chocolate rounds.


Voila!

If you’re not up for the challenge, one can also visit Chez Christophe in his shop this Easter season.
Chez Christophe
4712 Hastings St
Burnaby, BC V5C 2K8
(604) 428-4200

Follow Channels and Categories